

My family’s secret recipe for the Best Authentic Falafel, made with chickpeas, fresh herb, and the right spices! And, I’m sharing my complete step-by-step tutorial and important tips for baking or frying falafel. Be sure to also watch the video to see how I make it!
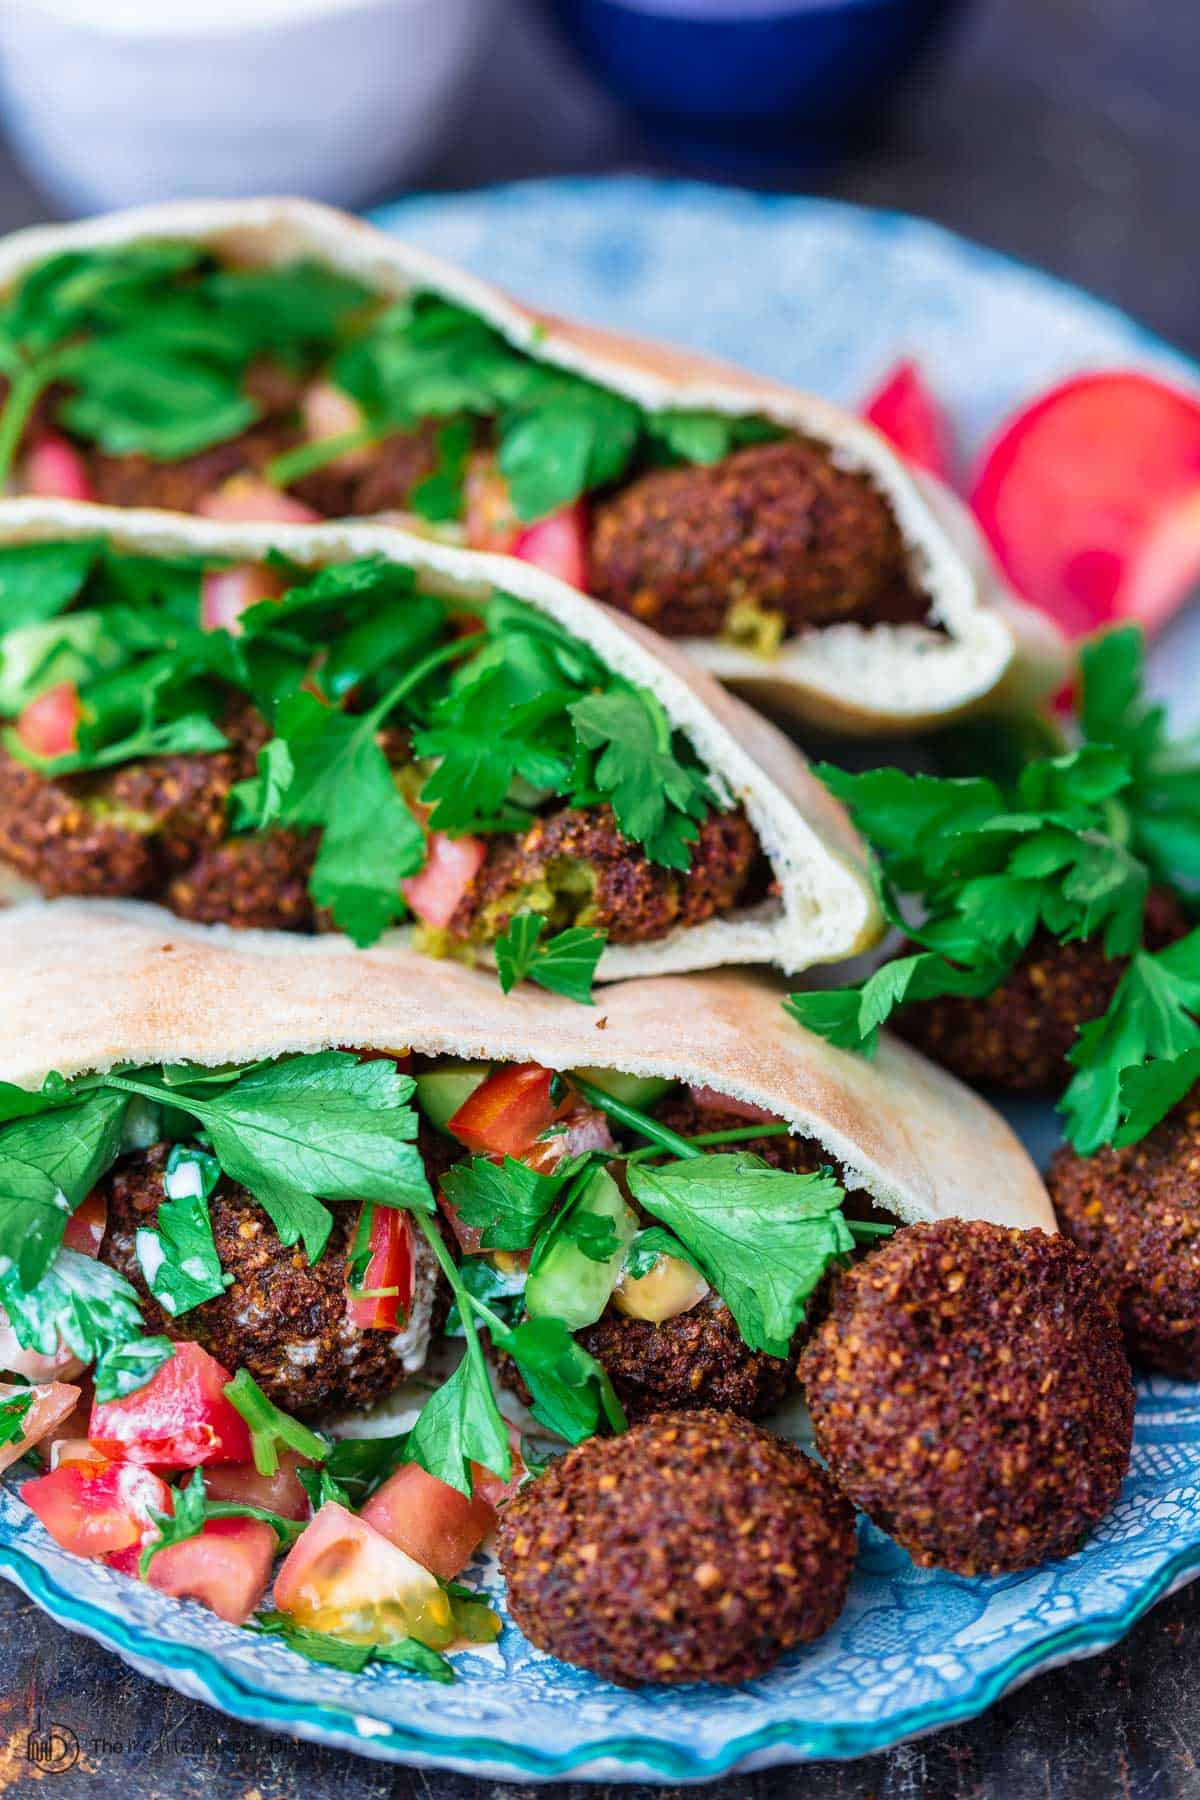
What’s your favorite way to enjoy falafel? I love them in warm pita sandwiches with tahini sauce or hummus, along with my lazy Mediterranean tomato and cucumber salad. But you can enjoy it alongside other plates or as part of a mezze spread (lots of ideas below!)
Growing up in Port Said, Egypt, one of my favorite foods ever was falafel!
My father’s friend owned a small falafel shop that was located in the heart of the souq (market). Our weekends often involved a trip to see Mr. Bishay and partake of his fragrant falafels. You could smell them from miles away!
Over the years I have learned how to make my own authentic falafel and I am super excited to share my recipe with you! It’s as authentic and delicious as you’d find on the streets of the middle east. And easier to make than you think!
What is Falafel?
Falafel is a popular Middle Eastern “fast food” made of a mixture of chickpeas (or fava beans), fresh herbs, and spices that are formed into a small patties or balls. It’s thought that falafel originated in Egypt as Coptic Christians looked for a hearty replacement for meat during long seasons of fasting or lent. It has also become a popular vegan food in Egypt and throughout the Middle East.
Falafel continues to be the people’s daily grub in Egypt and you can find it from street vendors in almost every neighborhood. It’s often served in sandwich form with a generous drizzle of tahini and loads of Mediterranean salad, along with slices of roasted or fried eggplant.
This vegan dish is made with simple, everyday ingredients and you won’t believe how easy it is. Great ingredients are key to great falafel so be sure to purchase high quality spices like cumin and coriander for your falafel mixture. I’ve got a few more tips for you below…
What I love about this recipe
– No canned chickpeas (very important!) If you’re after the best texture and flavor, you need to start with dry chickpeas. Many falafel recipes use canned chickpeas which is not authentic and will cause the falafel patties disintegrate in the hot cooking oil.
– Hearty and flavorful. Falafel patties are packed with plant-power and protein from the chickpeas that will leave you feeling full and satisfied. My recipe also uses the perfect blend of spices —cumin, coriander, and a hit of cayenne–and fresh herbs to give them bold authentic flavor.
– Make ahead and freezer friendly. I love that this recipe can be prepped ahead of time, and you can freeze uncooked falafel patties for later use.
Ingredients
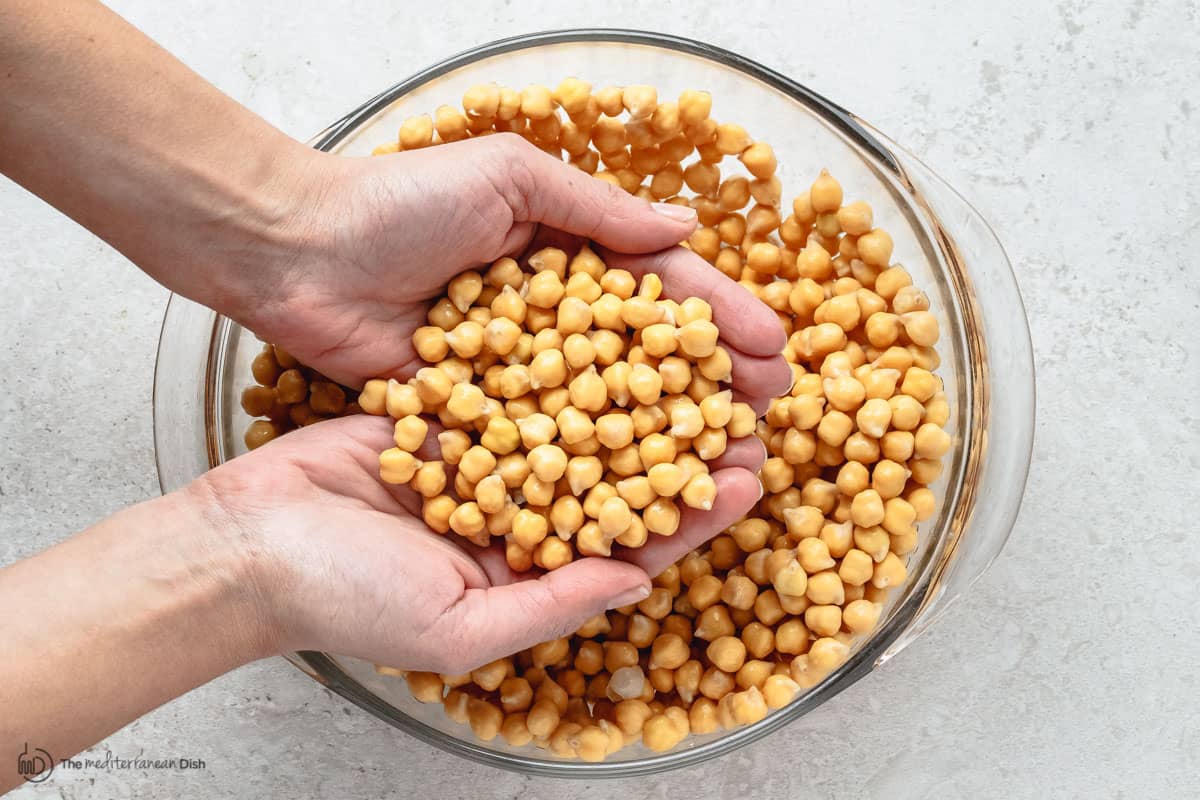
– Dried chickpeas: AVOID using canned chickpeas! Dried chickpeas (that have been soaked in water for 24 hours) are an important ingredient that will give your falafel the right consistency and taste. (Tip: I usually add about 1/2 tsp of baking soda to the soaking water to help soften the dry chickpeas.)
– Fresh herbs: fresh parsley, cilantro, and dill are key to this authentic recipe.
– Onion: I typically use yellow onions, but white or red onions would work.
– Garlic: for best flavor, use fresh garlic cloves.
– Kosher salt and pepper: to taste.
– Spices: cumin, coriander, and a little cayenne pepper. Along with the fresh herbs, this trio of spices is what gives falafel it’s bold authentic taste.
– Baking powder: this is what gives falafel an airy, fluffy texture (many recipes skip this, causing the falafel to come out too dense.)
– Sesame seeds: these are optional here, but I do like the added nuttiness.
How to Make Falafel: Step-by-Step
1. Soak chickpeas for 24 hours. Cover them in plenty of water and add baking soda to help soften them as they soak. The chickpeas will at least double in size as they soak. Drain very well.
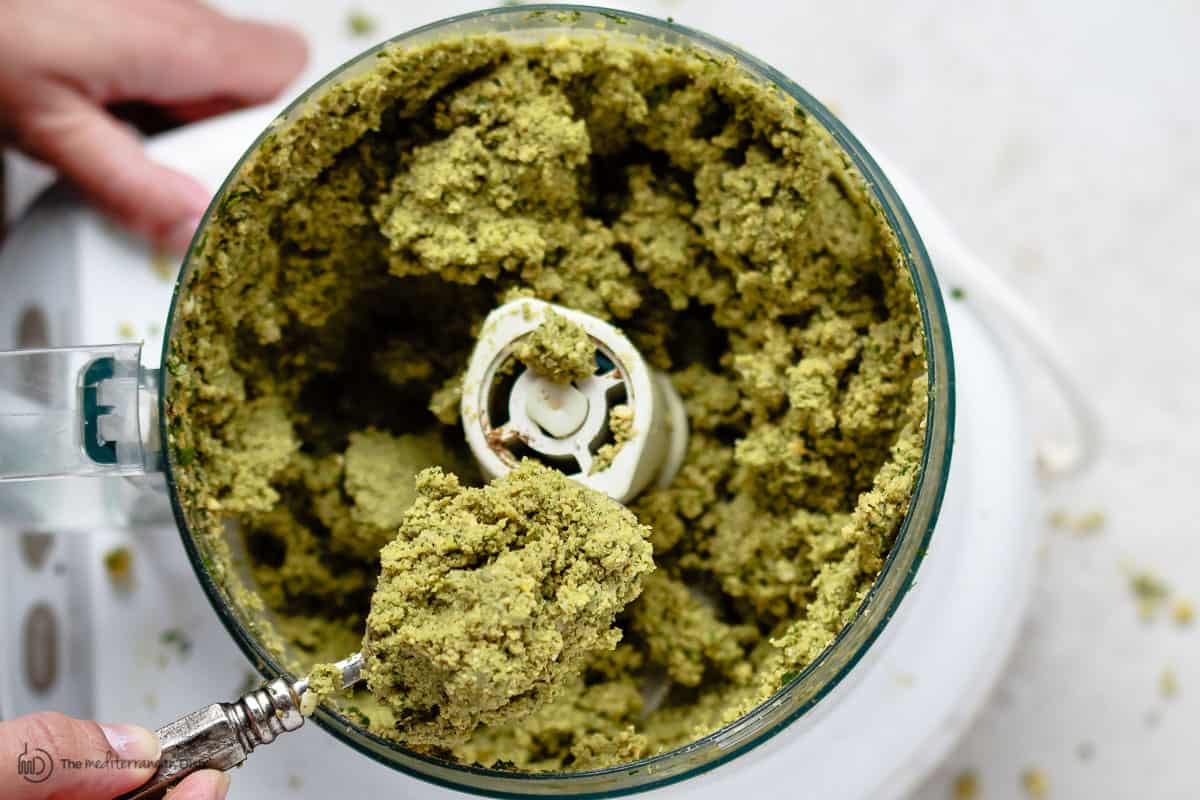
2. Make mixture. Add chickpeas, fresh herbs (parsley, cilantro, and dill), garlic, onion, and spices to food processor and pulse a little bit at a time until the mixture is finely ground. You’ll know it’s ready when the texture is more like coarse meal.
& Refrigerate (important.) Transfer the falafel mixture to a bowl, cover and refrigerate for at least 1 hour or overnight. The chilled mixture will hold together better, making it easier to form the falafel patties.
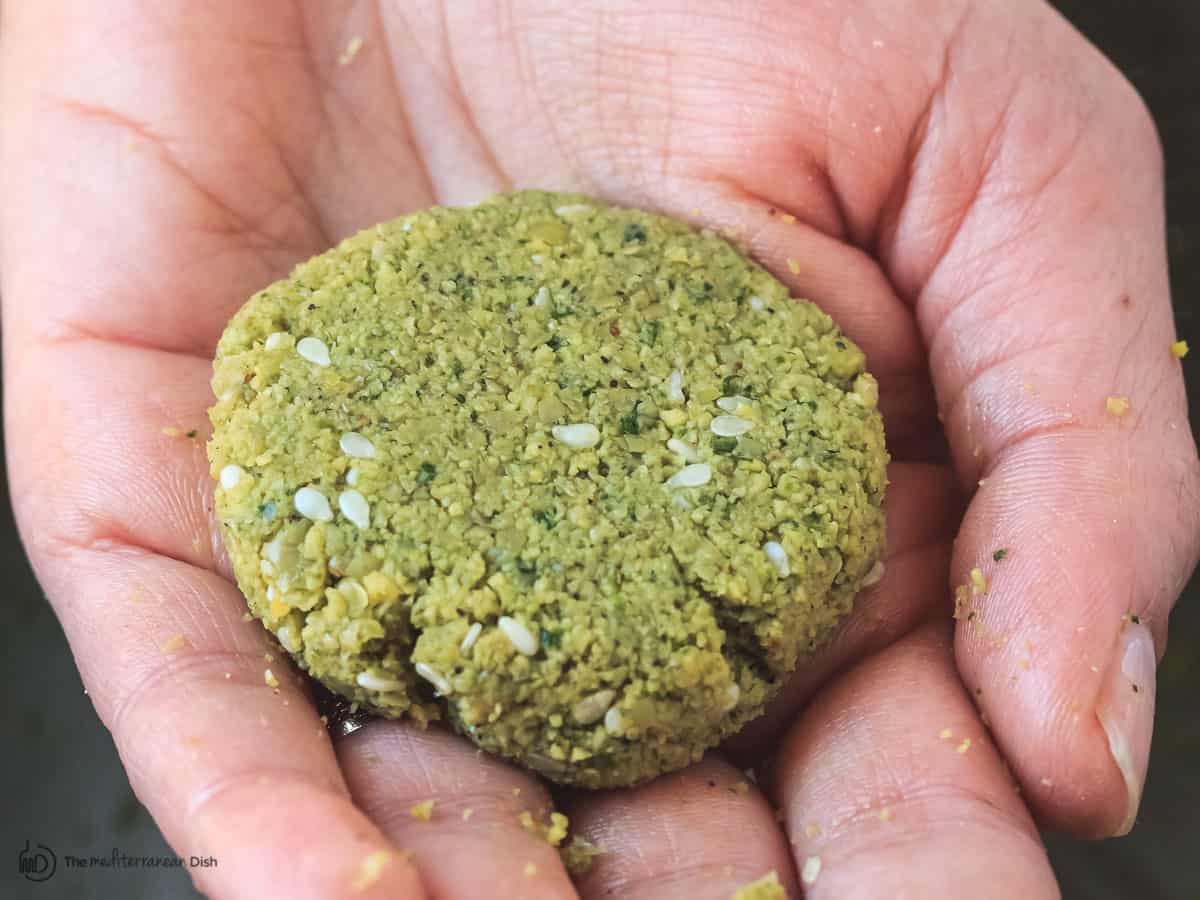
3. Form patties or balls. Once the falafel mixture has been plenty chilled, stir in baking powder and toasted sesame seeds, then scoop golf ball-sized balls and form into balls or patties (if you go the patties route, do not flatten them too much, you want them to still be nice and fluffy when they’re cooked.)
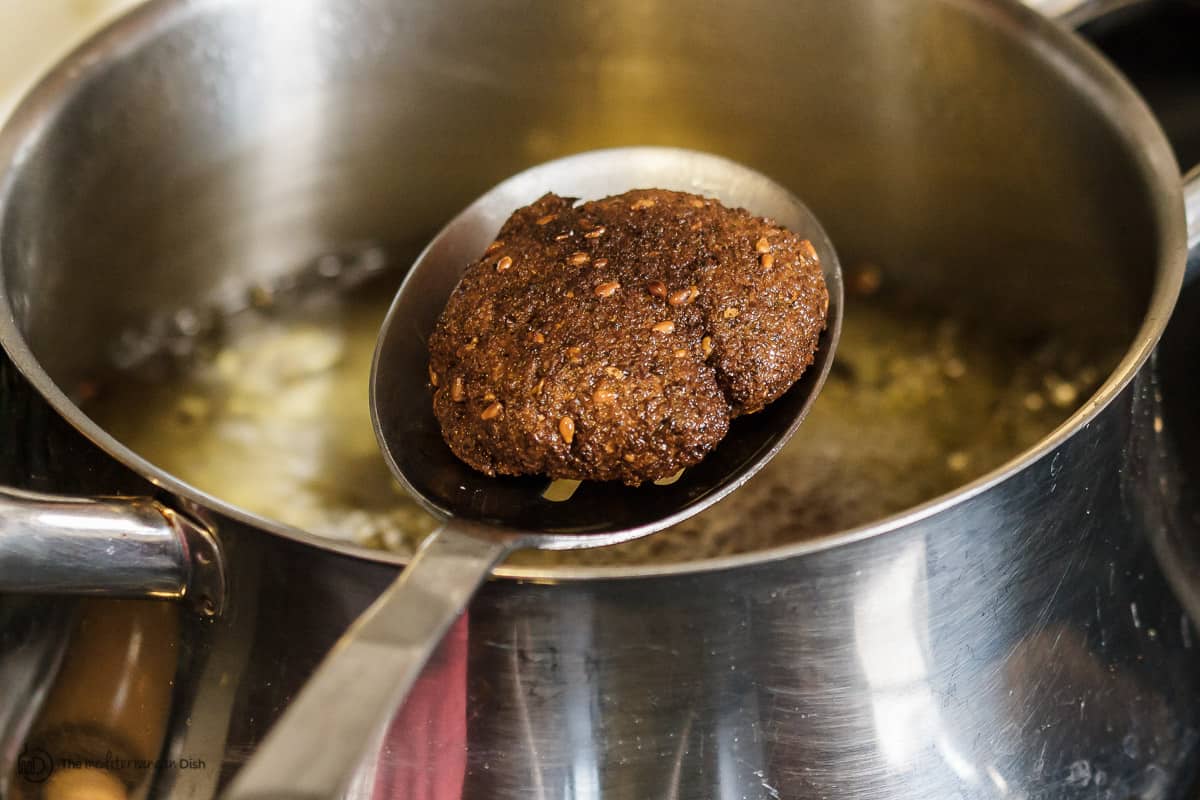
4. Fry. Frying is the traditional way to cook falafel and yields the most authentic and best result. Heat the oil on medium-high until it bubbles softly (your oil should be hot enough around 375 degrees F, but not too hot that it causes the falafel to fall apart.)
Carefully drop the falafel in the oil, using a slotted spoon, and fry for 3-5 minutes until medium brown on the outside. Avoid over-crowding the falafel; fry them in batches if necessary.
Tip: it’s always a good idea to fry one falafel first to make sure the oil temperature does not need to be adjusted.
You can serve falafel for breakfast, lunch, or dinner! Most Egyptians, and others throughout the Middle East actually start their day with falafel, much like many here in the States start with a bowl of cereal.
Important Tips
I shared some of these earlier in the post, but just in case you missed them:
1. Always use dry chickpeas. Dry chickpeas, that have been soaked in water for 24 hours, will give you the best texture and flavor. Dry chickpeas are naturally starchy and will help your falafels to stay well formed. If you use canned chickpeas, your falafel will disintegrate in the frying oil.
2. Chill the falafel mixture. Chilling for at least 1 hour helps with the shaping. And good news is, you can make the falafel mixture one night in advance and chill overnight.
3. Add baking powder to the falafel mixture before forming into balls/patties. As a raising agent, baking powder here helps make the falafel on the fluffy side.
4. Fry in bubbling oil, and do not crowd the saucepan. For perfectly crispy falafel, sadly, the best option is deep frying. The cooking oil should be hot and gently bubbling, but not too hot that the falafel disintegrate. If you need to, use a deep fry-safe thermometer (affiliate link); it should read around 375 degrees F (for my stove, that is medium-high heat.)
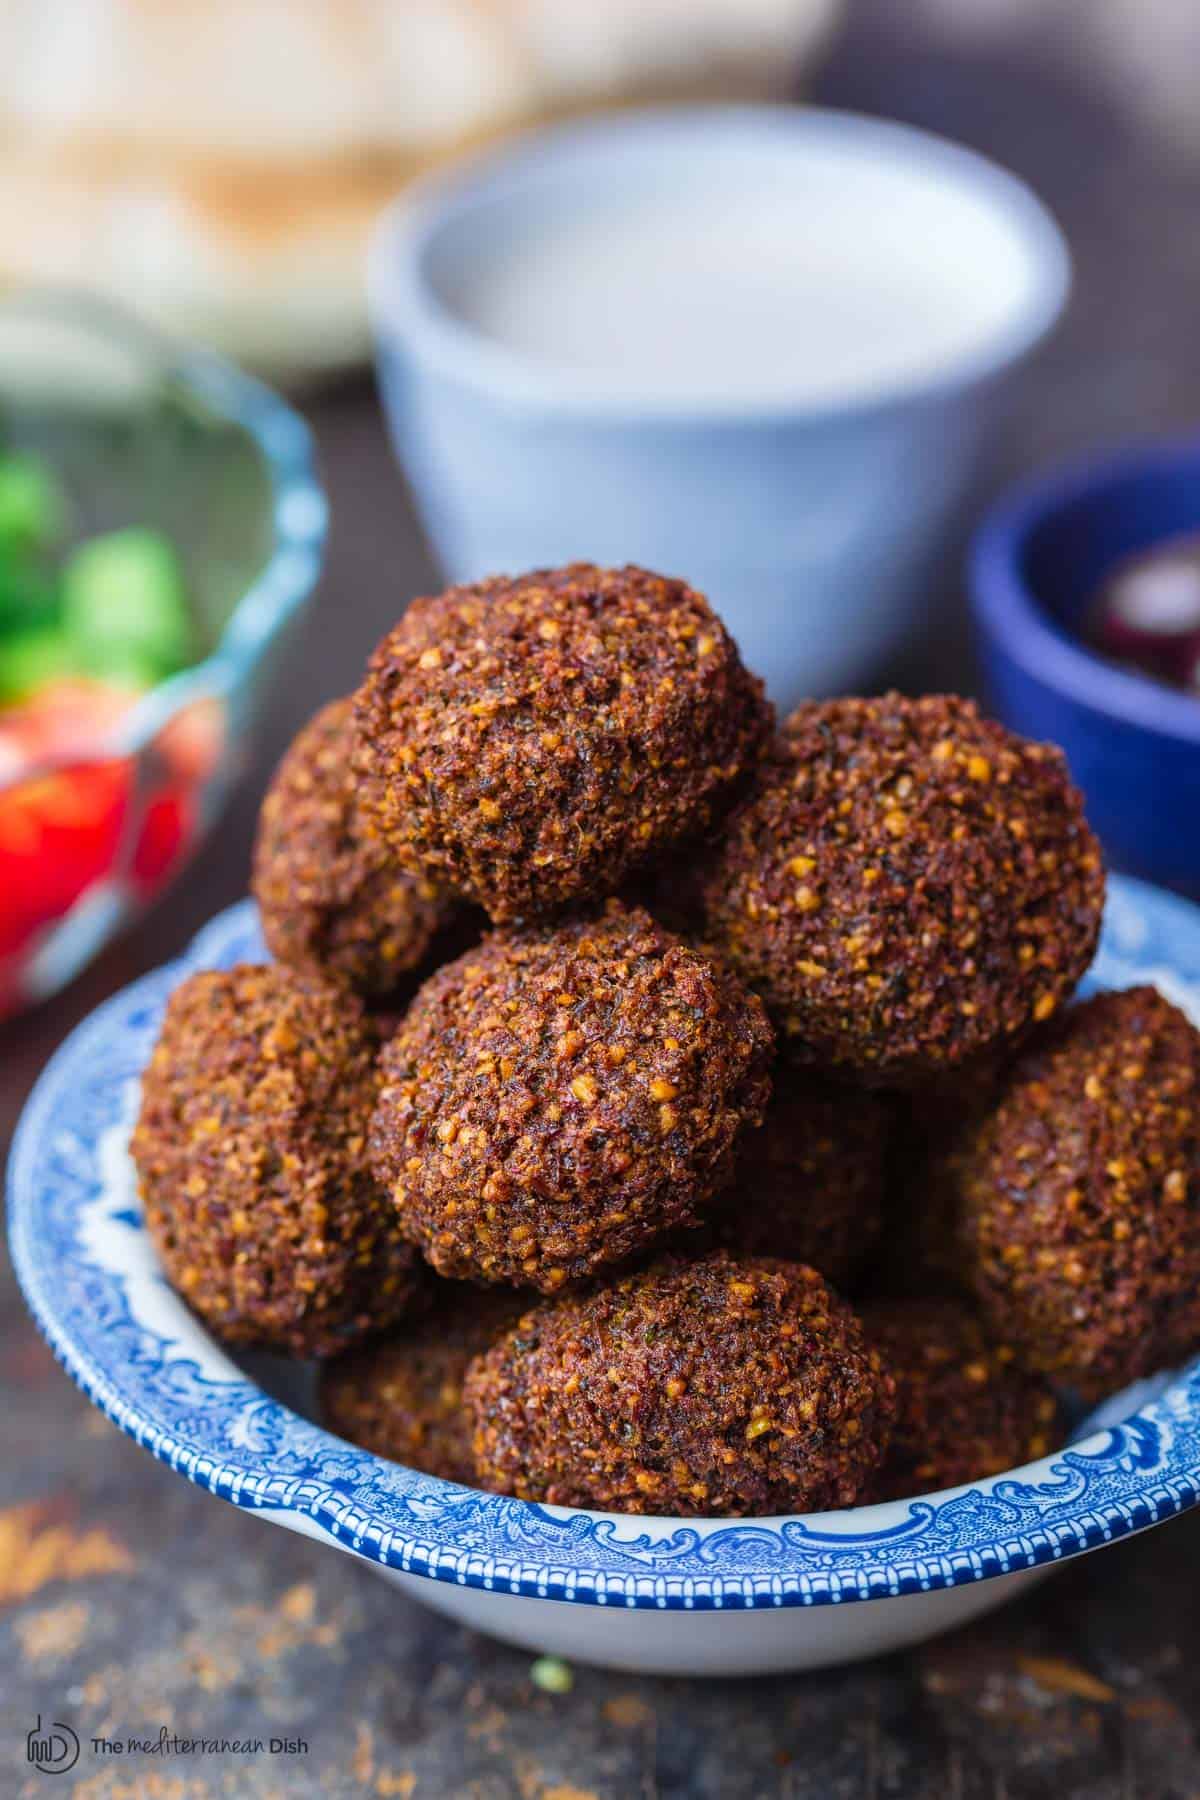
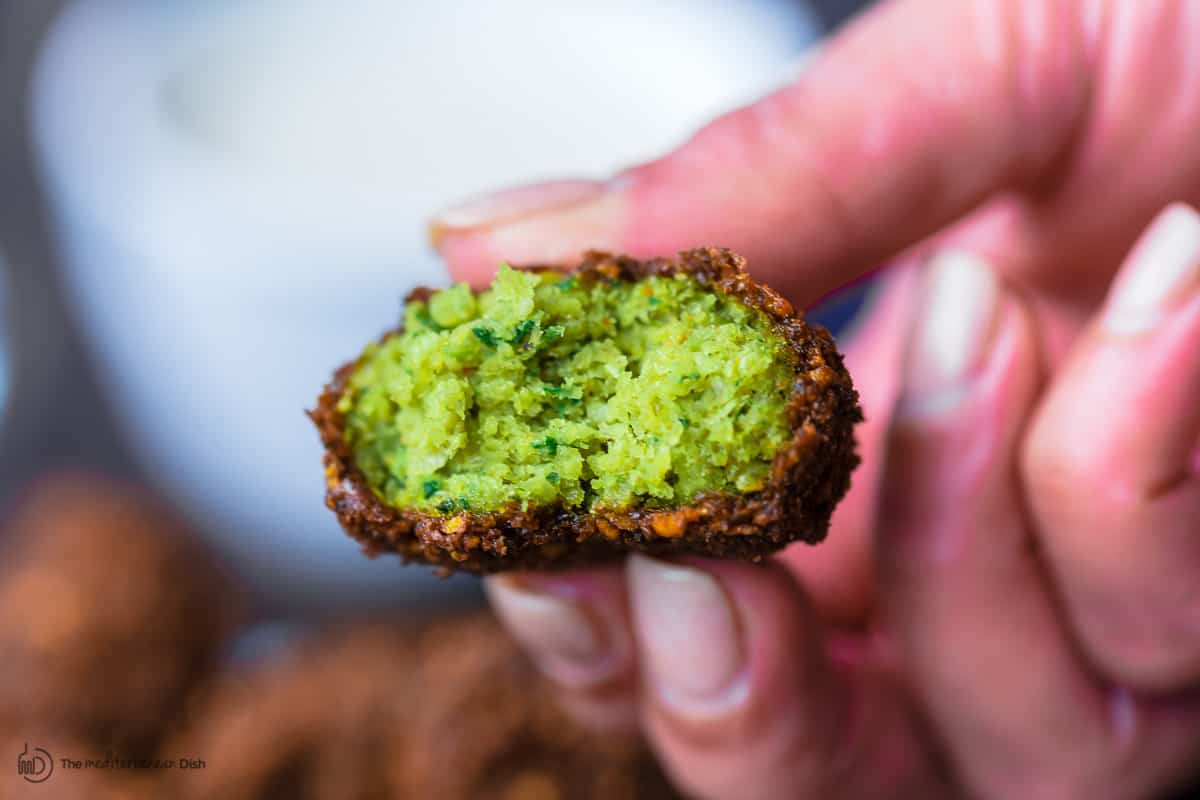
5- Once cooked, falafel should be crispy and medium brown on the outside, fluffy and light green on the inside.
For baked falafel
Preheat your oven to 350 degrees F and lightly oil a baking sheet. Give each patty a quick brush of extra virgin olive oil before baking; bake for about 15 to 20 minutes, turning the falafel patties over halfway through baking.
Make ahead and freezing
To make ahead: Prepared falafel mixture will keep in the fridge for 1-2 days ahead of time. Form it into patties when ready to fry.
To freeze: Place uncooked falafel patties on a baking sheet lined with parchment paper and freeze for 1 hour. Once hardened, transfer the patties into a freezer bag and freeze for up to 1 month. Falafel can be cooked from frozen by frying or baking.
Choose how to serve falafel
Middle Eastern Style: On the streets of the Middle East, falafel are typically served hot with a generous amount of tahini sauce.
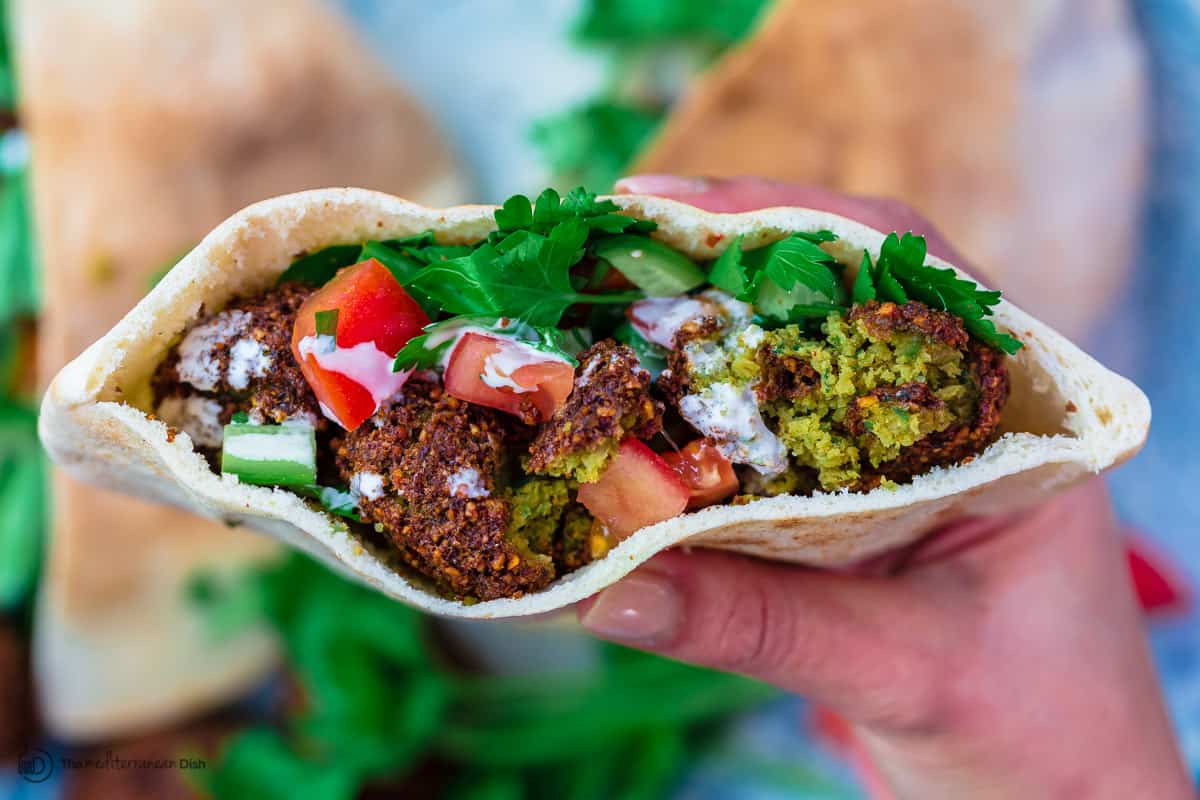
As a Sandwich: To make a mean falafel sandwich, garb some warm pita pockets, load them with falafel, drizzle with tahini and add fresh greens (like arugula), fresh diced tomatoes, cucumbers, and pickles.
On a brunch board: Serve your flalafel with an array of fresh veggies, cheese, and dips like I have don’t on my brunch board.
As a side: serve falafel next to small plates like Turkish-inspired fried eggplant, tabouli salad, or Balela Salad.
Dip it: If you’re looking to dip your falafel, definitely try my Classic Creamy Hummus or Baba Ganoush!
Watch video for this authentic falafel recipe
Browse our vegetarian recipes collection for more meatless ideas! For all recipes, visit us here. And be sure to view our collection of Mediterranean diet recipes.
NEVER MISS A RECIPE! JOIN MY FREE E-MAIL LIST HERE.
SHOP OUR ONLINE STORE FOR QUALITY OLIVE OILS, ALL-NATURAL SPICES AND MORE.
Print
How to Make Falafel
- Total Time: 50 minutes
- Yield: 24 Patties 1x
Description
Ready to learn how to make authentic falafel from scratch? My family’s secret recipe for the Best Authentic Falafel, made with chickpeas, fresh herb, and spices is all you need!
Be sure to check out the complete step-by-step tutorial, important tips for baking or frying falafel. And watch the video just above.
What’s your favorite way to enjoy falafel? I love them in warm pita sandwiches with tahini sauce or hummus, along with my lazy Mediterranean tomato and cucumber salad. But you can enjoy it alongside other plates or as part of a mezze spread (lots of ideas below!)
Ingredients
- 2 cups dried chickpeas (Do NOT use canned or cooked chickpeas)
- 1/2 tsp baking soda
- 1 cup fresh parsley leaves, stems removed
- 3/4 cup fresh cilantro leaves, stems removed
- 1/2 cup fresh dill, stems removed
- 1 small onion, quartered
- 7–8 garlic cloves, peeled
- Salt to taste
- 1 tbsp ground black pepper
- 1 tbsp ground cumin
- 1 tbsp ground coriander
- 1 tsp cayenne pepper, optional
- 1 tsp baking powder
- 2 tbsp toasted sesame seeds
- Oil for frying
Falafel Sauce
Fixings for falafel sandwich (optional)
- Pita pockets
- English cucumbers, chopped or diced
- Tomatoes, chopped or diced
- Baby Arugula
- Pickles
Instructions
- (One day in advance) Place the dried chickpeas and baking soda in a large bowl filled with water to cover the chickpeas by at least 2 inches. Soak overnight for 18 hours (longer if the chickpeas are still too hard). When ready, drain the chickpeas completely and pat them dry.
- Add the chickpeas, herbs, onions, garlic and spices to the large bowl of a food processor fitted with a blade. Run the food processor 40 seconds at a time until all is well combined forming a the falafel mixture.
- Transfer the falafel mixture to a container and cover tightly. Refrigerate for at least 1 hour or (up to one whole night) until ready to cook.
- Just before frying, add the baking powder and sesame seeds to the falafel mixture and stir with a spoon.
- Scoop tablespoonfuls of the falafel mixture and form into patties (1/2 inch in thickness each). It helps to have wet hands as you form the patties.
- Fill a medium saucepan 3 inches up with oil. Heat the oil on medium-high until it bubbles softly. Carefully drop the falafel patties in the oil, let them fry for about 3 to 5 minutes or so until crispy and medium brown on the outside. Avoid crowding the falafel in the saucepan, fry them in batches if necessary.
- Place the fried falafel patties in a colander or plate lined with paper towels to drain.
- Serve falafel hot next to other small plates; or assemble the falafel patties in pita bread with tahini or hummus, arugula, tomato and cucumbers. Enjoy!
Notes
- Cook’s Tip: You need to start with dry chickpeas, do not use canned chickpeas here. You will need to begin soaking the chickpeas overnight, allow up to 24 hours.
- Falafel Recipe variations: Variations of this recipe may call for flour or eggs. If you prefer, you can add 1 to 1 1/2 tbsp of flour to the falafel mix or 1 egg. I did not use either, and the falafel mixture stayed well together.
- Pro Tip for Frying: When you fry the falafel patties, you want to achieve a deep golden brown color on the outside. More importantly, the patties need to be fully done on the inside. Your frying oil needs to be at 375 degrees F, for my stove, that was at a medium-high temp. Be sure to test your first batch and adjust the frying time as needed.
- Have an air fryer? Try this air fryer falafel recipe.
- Popular falafel sauce: tahini sauce is what is traditionally used with falafel. I use organic tahini paste by Soom, and here is my tahini sauce recipe.
- Baked Falafel Option: If you prefer, you can bake the falafel patties in a 350 degree F heated oven for about 15-20 minutes, turning them over midway through. Use a lightly oiled sheet pan, and you might like to give the patties a quick brush of extra virgin olive oil before baking.
- Pro-Tip for Make-Ahead: To make ahead and freeze, prepare the falafel mixture and divide into patties (up to step #6). Place the patties on a baking sheet lined with parchment paper and freeze. When they harden, you can transfer the falafel patties into a freezer bag. They will keep well in the freezer for a month or so. You can fry or bake them from frozen.
- Visit our online shop to browse all-natural and organic spices, including cumin and coriander; organic tahini paste; extra virgin olive oils and more!
- Prep Time: 30 mins
- Cook Time: 20 mins
- Category: Entree
- Method: Fried or Baked
- Cuisine: Middle Eastern
*This post first appeared on The Mediterranean Dish in 2015 and has been recently updated with new information and media for readers’ benefit.
These were a huge success, thank you for the recipe!
I also made tabouli and hummus and it was a stress free cook.
This recipe is a keeper.
Love to hear that! Thanks, Sue!
How is this “easy” when it takes 3 days to prepare? I was looking for something I could start making after work, not a recipe that requires a stay at home kitchen staff.
Hi, Alex. Aside for the bit of time it takes to let the chickpeas soak, we do feel like the recipe itself is pretty easy to prepare. Also, the prep time is not three days. We recommend and overnight soak of the chickpeas, but the falafel can be entirely made the next day.
The closest recipe to authentic. Works really well and has most of the right ingredients and techniques. I’ve mixed fava beans along with chickpeas as a personal preference. I also backed the little guys with similar results to frying.
I just made your Falafels exactly with the listed description. And it turned out great! However I have more than I needed. So now the question is, can I freeze the cooked Falafels, and if so, how do I reheat them afterwards, if it’s possible.
Hello! You definitely can freeze the leftovers. Just place the patties on a baking sheet lined with parchment paper and freeze. When they harden, you can transfer the falafel patties into a freezer bag. When you’re ready to enjoy them, you can reheat them directly in the oven from the freezer at 350 F for about 15 to 20 minutes, turning halfway through cooking time.
Amazing recipe. Thank you. I made one slight change, using split chick peas as I’d run out of whole. They took less soaking time. This web site is rapidly becoming one of my faves.
I followed your directions exactly, including the overnight soak and a second overnight rest after processing, and they turned out so good I almost cried. Your tips about the oil temperature was super helpful as I was nervous about that part, but I used an instant-read thermometer and was able to adjust as needed. Thank you so much for taking the time to walk us through the recipe, I’m so excited to have a stash in my freezer that I can fry up whenever I want!
Awwww! Thanks, Carolyn! I think using a thermometer to monitor the temp can be key here. Glad you found that suggestion helpful!
Do you have to cook the chickpeas after soaking them prior to blending and pan frying them?
Hi, Emily. Nope! Just go ahead and blend the soaked chickpeas. There’s no need to cook them first. Enjoy!
I don’t know what it is about this recipe but I’ve tried it twice now but I can only get the balls to form if I add chickpea flour. They will not stick together and this is before it goes into the oil. Once I can get the balls to form and cook they are delicious.
I had a falafel decades ago, 1980s.bi LOVED it! I am excited to try this and see how it measures up, and happy to report back. As a senior with truly limited funds and only a mini fridge and freezer, I need foods that are #1 healthy, and #2 stretchable! Sound workable!!
Hi, Marcia! Hope you love this one! Be sure to check out some of our bean recipes as well. They are usually healthy, simple and very stretchable! This Garlic Parmesan White Bean recipe is hugely popular around here!
I have just found this recipe and definitely want to try it. I do have a question for you though; my ex usually tried to remove most of the skins from the chickpeas after the soak. Is that not necessary? I realize it gets blitzed but curious about the difference. Thank you and I’m looking forward to making a batch.
Hi, Judy. We don’t feel like it’s necessary to remove the chickpea skins with this recipe. Equally delicious, and way less time consuming :).
Isn’t it curious how we continue to do things as our ex preferred? Some of our take-aways are actually good – like (for me) the way to fold T-shirts), but then there are those that aren’t necessary, like removing the skins from chickpeas.
My falafels turned out great thanks for your recipe.
Amazing!!! This recipe is yummy!! I used everything except the dill and fried them in avocado oil. I also purchased the thermometer because I needed one anyway. I even used your tahini recipe. WOW! It made alot for just one person so I’m definitely going to freeze some of it. Thank you!!
Falafel is great for vegetarians or vegans.
Great for Lent.
Very tasty.
I agree! 🙂
I am so incredibly happy that you put your recipes out for the world! I’ve made your dolmas and now these falafels, and they taste so similar to what I crave from my favorite Lebanese restaurant. (It’s an hour from me, so I don’t get it very often.) I followed your recipe closely and these turned out perfectly. I would just add more salt next time – maybe you could provide a little guidance there since it’s hard to know how much salt is “to taste” in the dough form. Question: I made a big batch and fried them all. What’s your best way to reheat them? I would think heating them up in the oven or air fryer, right?
Thanks for the feedback, Lily! Yes, you can reheat them in an oven or air-fryer.
Wonderful ingredients and easy to follow! Yum yum
So glad you enjoyed it!
The patties completely disintegrated in the oil!
Hi, Baz. That typically means your oil was too hot. There are several tips/tricks listed in the article and in the comments section here that may help with this issue in the future. We hope you give it another try!
Thanks for the tip about the oil temp., as my patties fell apart in the oil also (I was so hungry for these!!)